
Contents What are Enhanced Conversions?
Conversion tracking is the data foundation Smart Bidding works from. When your tracking has holes from cookie blockers, iOS Safari, and cookieless browsers, Smart Bidding learns from an incomplete picture and bids more conservatively than it actually should. Enhanced Conversions are a concrete fix for that.
In this post I’ll show you how Enhanced Conversions work, a full setup walk-through via Google Tag Manager, how to check status and match rate, and how to debug in detail when something goes wrong. What you won’t find here: a complete guide to the regular conversion tracking setup. That gets its own post.
The essentials at a glance
- What they do: Enhanced Conversions add hashed customer data to your conversion tracking, like email, phone number, name, and address, which Google can match across devices.
- Prerequisite: You already have regular conversion tracking set up in Google Ads. Enhanced Conversions are an extension, not a replacement.
- Setup order: First activate it in Google Ads, then connect the data source in GTM and extend the conversion tag.
- Status check: You’ll find match rate and diagnostics in the Google Ads interface, in the diagnostics section of the conversion action (as of 2026-05; Google UI paths change from time to time, the area is currently called “Goals > Diagnostics”).
- Debugging: In the browser network tab, filter for
/conversionand search the payload for thetv.1~emparameter, which holds the hashed email.
What are Enhanced Conversions?
Enhanced Conversions are a feature in Google Ads that sends first-party customer data to Google on top of the regular conversion tracking. The data is hashed before it’s transmitted, meaning it’s one-way encrypted: Google never sees readable plain text, but it can recognize two identical emails by the same hash.
The feature exists because regular conversion tracking has more and more gaps. iOS Safari, Firefox, ad blockers, and cookieless browsers block tracking cookies, so a share of purchases no longer lands in the conversion reporting. Smart Bidding learns from less data and bids more conservatively.
Enhanced Conversions send a second path to Google that works independently of cookies: the buyer’s hashed email address, for example. Google compares the hash against the hashes of signed-in Gmail accounts and attributes the conversion to the original click, even when the purchase happened on a different device.
There are two variants:
- Enhanced Conversions for Web: for online conversions like purchases and sign-ups. The most common use case in an online shop context.
- Enhanced Conversions for Leads: for lead tracking with later offline conversion attribution. More relevant in B2B.
This post covers the Web variant.
Enhanced Conversions are one of several advanced conversion-tracking measures for better data quality. Related topics are server-side tracking (tracking runs on a server instead of in the browser) and profit-first tracking with POAS (margins instead of revenue as the conversion value). If your regular conversion tracking isn’t running cleanly yet, you’re better off starting there.
What data Google needs
For Enhanced Conversions for Web, Google accepts four data fields:
email(highest match rate, my clear recommendation as a must)phone_number(medium match lever)address.first_name,address.last_name(weak alone, strong in combination)address.street,address.city,address.region,address.postal_code,address.country(weak alone, strong in combination)
You can hand over the values in plain text, and Google normalizes and hashes them on its servers. The one thing that matters: if you want to hash the data yourself (see Step 5 below), you have to normalize it first (lowercase, whitespace removed, phone numbers in E.164 format).
How to set it up via Google Tag Manager (7 steps)
Google offers two setup paths, the direct path via the Google tag and the path via Google Tag Manager. Both work. The GTM path gives you more control and is often the better one in an online shop context.
Step 1: Activate it in Google Ads
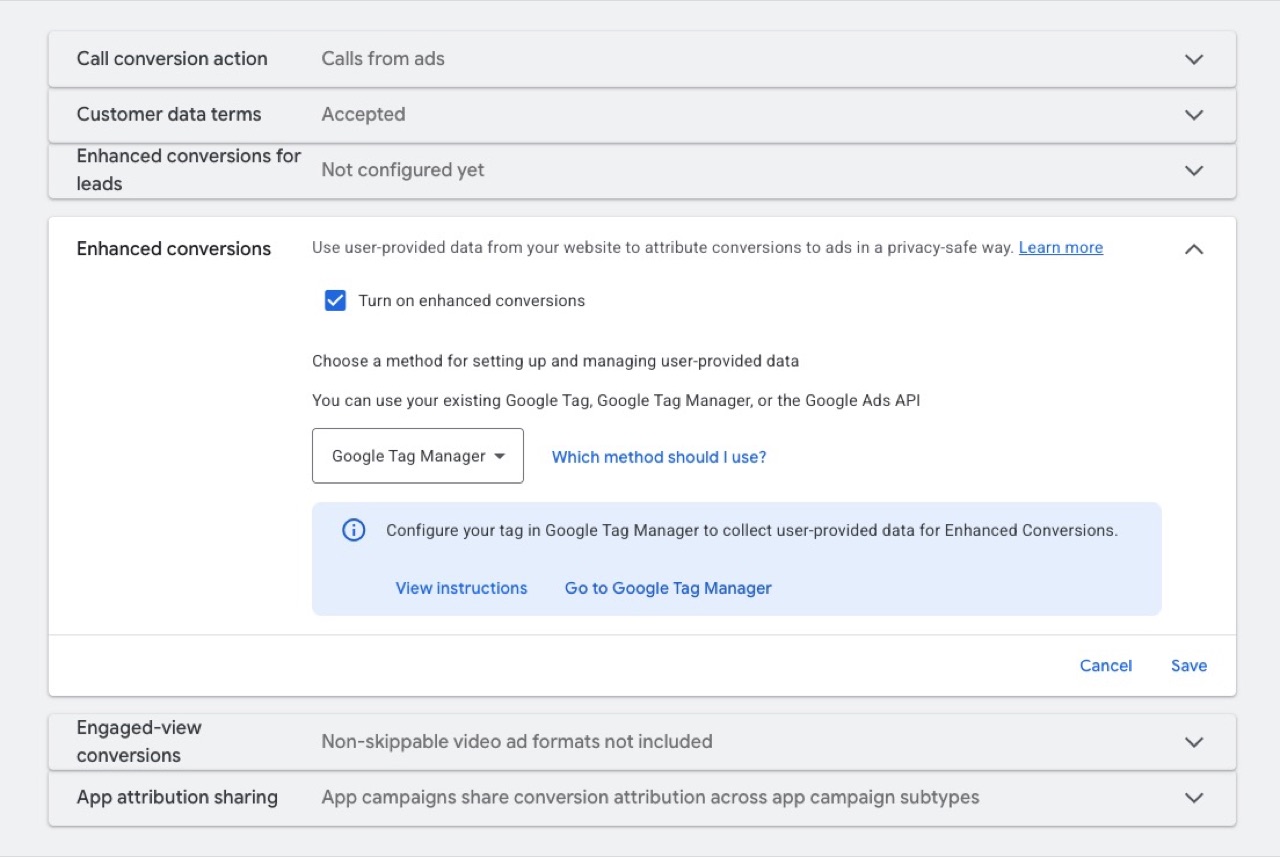
Before you configure anything in GTM, you have to activate Enhanced Conversions in Google Ads. The prerequisite is that you already have a conversion action set up that handles the regular tracking. Then go into the conversion action and open the “Enhanced Conversions” section. Activate the feature and pick “Google Tag Manager” as the implementation method.
Step 2: Choose the data source for the email
Before you create variables in GTM, you have to decide where the email on the conversion page comes from. There are three sources Google officially supports:
- dataLayer: The shop or a plugin pushes the email into the dataLayer (a data structure in the browser that GTM reads out) on the conversion event. In my view the cleanest path, because it’s reproducible and independent of how the frontend is built.
- DOM element: You select the HTML element that holds the email via CSS selector (for example a confirmation text or a hidden field). It works without a dataLayer change too, but it’s fragile when the frontend template gets rebuilt.
- First-party cookie: When the email is stored in your own cookie at login or checkout, you can read it from there. This assumes your shop writes that cookie.
If you have the choice: dataLayer. The following steps show the dataLayer path in detail. For DOM element and cookie the logic is the same, you just pick the matching GTM variable type in Step 3.
Step 3: Create the GTM variable for the email
In GTM you create a user-defined variable for the email, depending on the source from Step 2:
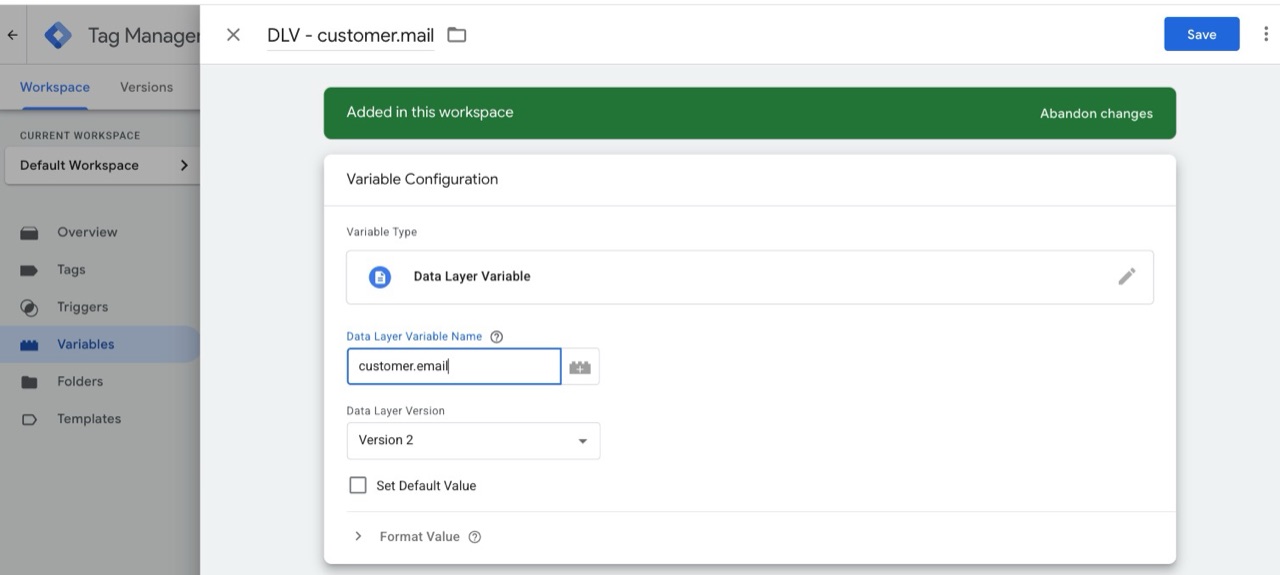
- For dataLayer: a variable of type “Data Layer Variable” with the matching path (for example
customer.email). - For DOM element: a variable of type “DOM Element” with a CSS selector.
- For cookie: a variable of type “First-Party Cookie” with the cookie name.
Name the variable consistently (for example “User Email”). If you want to send phone, name, or address on top, create a separate variable for each field.
Step 4: Create the User-Provided Data variable in GTM
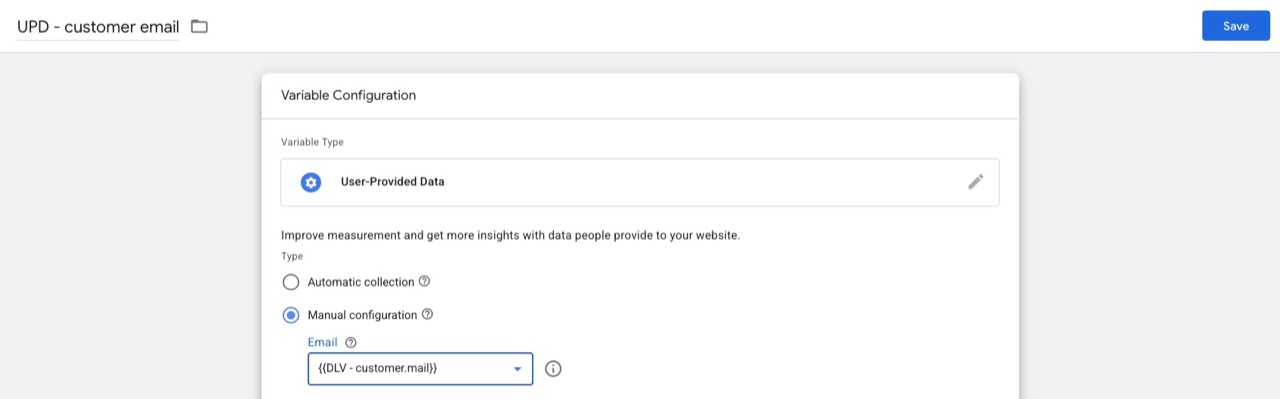
Now you need a special GTM variable that bundles all the customer data fields into one object and passes them to the conversion tag. Create a new variable of type “User-Provided Data”. Choose the configuration method “Manual configuration” and link the variables from Step 3 to the matching data fields (email to User Email, phone to User Phone, and so on).
Step 5: Extend the conversion tag
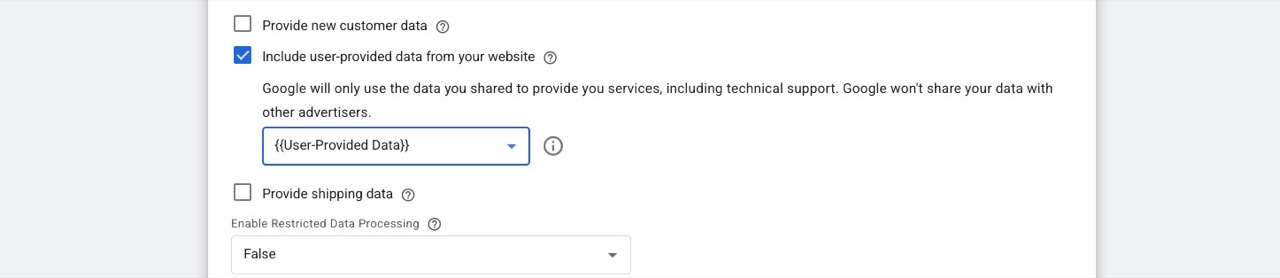
Open your existing Google Ads conversion tracking tag in GTM. In the tag detail you activate the option “Allow user-provided data capabilities”. In the section that opens up you connect the User-Provided Data variable from Step 4.
If you want to handle the hashing yourself (for example because your data protection setup requires that the plain-text data never leaves the browser), you can use a Custom JavaScript variable that applies SHA-256 locally and map the hashed values onto the fields with the sha256_ prefix. For most setups, Google’s automatic hashing is enough.
Step 6: Test in GTM preview mode
Activate preview mode in GTM and run a test conversion in an incognito window, so no old cookies get in the way. In the GTM debug panel you’ll see:
- Whether the conversion tag fired
- Which values were in the user-provided data fields
- Whether the GTM variables reached the dataLayer (or the other source)
If a value is empty or undefined, go back to Step 3 and check the variable path.
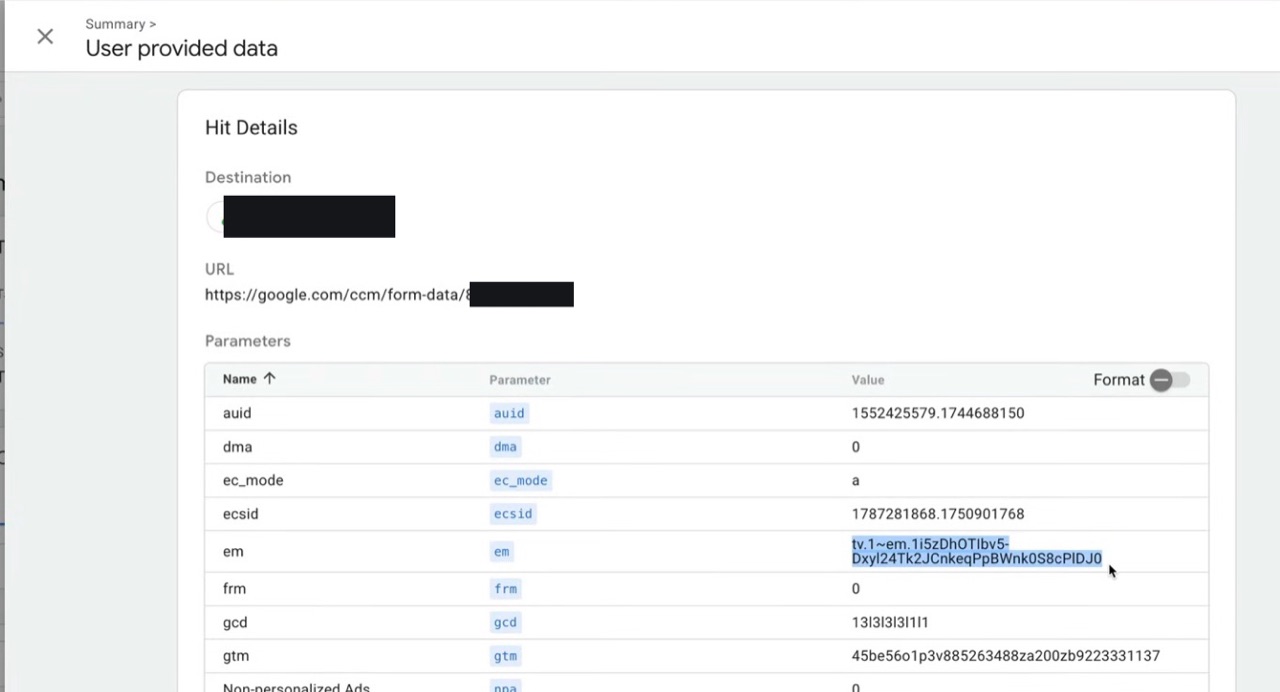
If you click the Google Ads tag in Tag Assistant and open the hit details under “User provided data”, you’ll see the em parameter with a value like tv.1~em.<hash>. That’s the hashed email going to Google, and the best proof that Enhanced Conversions are actually being sent.
Step 7: Publish
When the test runs cleanly, you publish the GTM container. Give it a clear version name like “Enhanced Conversions Setup”, so on your next refresh you know what was set up and when.
You want more results with Google Ads?
Get a free Google Ads Reality Check: a compact video (about 10 minutes) showing where budget is slipping away in your account and what to change.
Get your Google Ads Reality Check →
How to check status and match rate in Google Ads
After the setup you need a few hours before Google has gathered enough data. The diagnostics report in Google Ads shows you the current status and the match rate. You’ll find it in the conversion action itself, in a section called “Diagnostics” (depending on the UI language). As of 2026-05 the area sits under “Goals > Diagnostics > View details”; Google changes paths like this from time to time, so check the current UI navigation if needed.
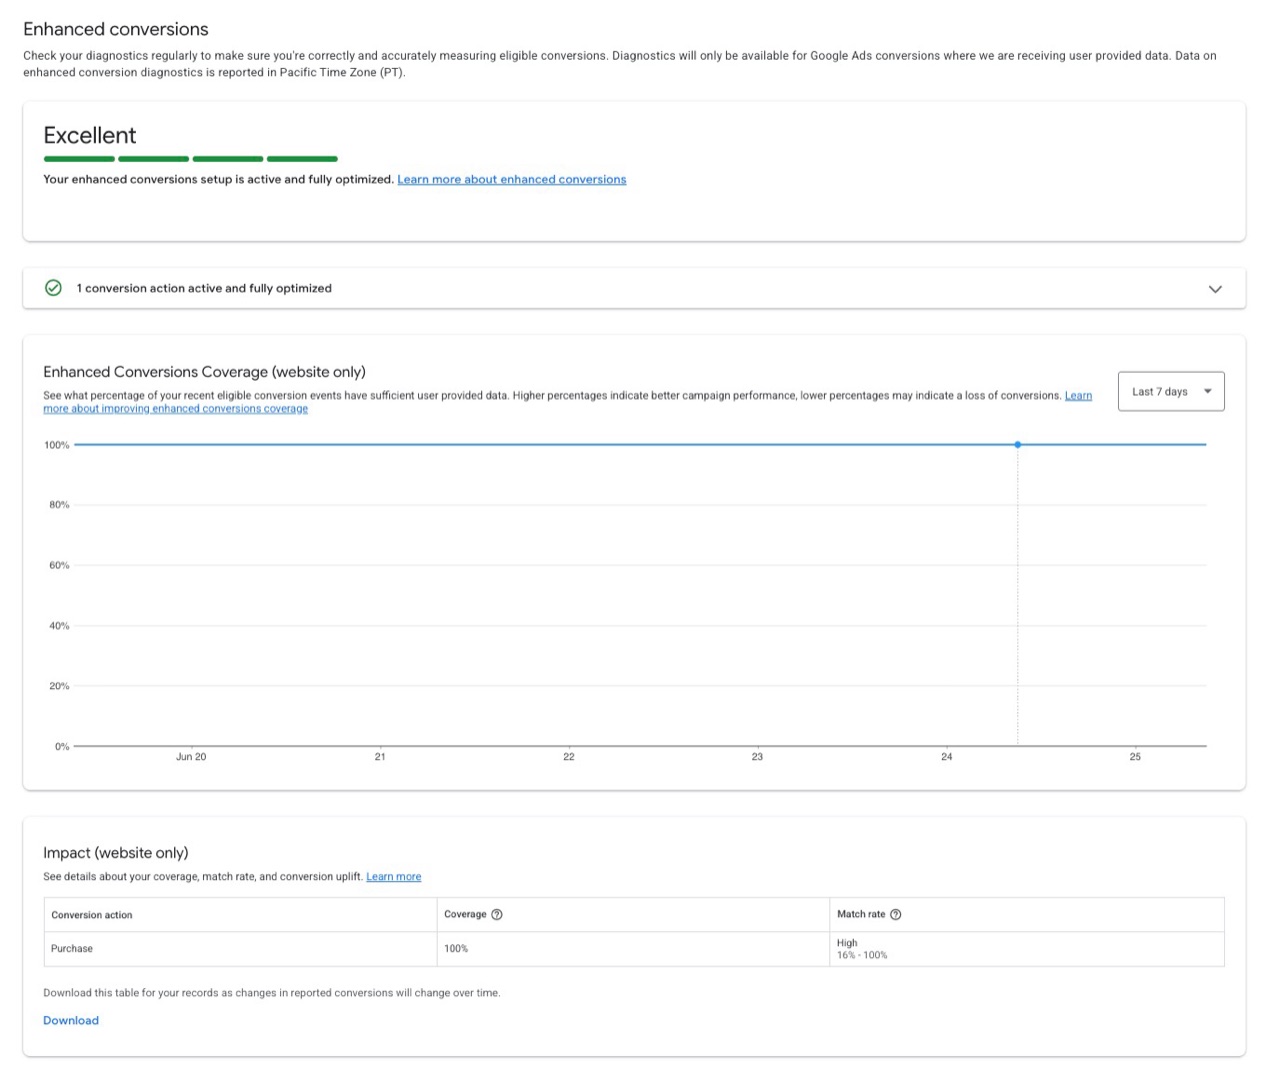
The match rate tells you how many of the sent data points Google could attribute to Google accounts. Match rates are industry- and audience-specific, so a direct comparison with other shops doesn’t tell you much. What matters more is the trend over time and how it reacts to setup changes.
How to debug Enhanced Conversions
When the match rate is low or the diagnostics report flags a tag setup problem, work through these diagnostic steps in order:
1. Check the dataLayer
Open the browser console on the confirmation page and type dataLayer. The customer data should be visible there. If the field is empty or undefined, the problem is in the shop setup, not in GTM.
2. GTM preview mode
Run a test conversion and look in the GTM debug panel at which values were in the user-provided data fields. Empty values mean the GTM variables aren’t reaching the dataLayer.
3. Network tab with the em-parameter check
This is the most reliable test. Open the developer tools in the browser (F12), switch to the network tab, and filter the requests for /conversion. Reload the confirmation page (or run a test conversion) and click the conversion request that fires.
In the payload tab you search for the tv.1~em parameter. That’s the hashed email being sent to Google. Three scenarios:
tv.1~emis present and at least 10 characters long: hashing works, the data is coming through.tv.1~emis empty or missing: setup problem. Go back to Step 1 (check the dataLayer).tv.1~emcontains plain text: hashing is missing. If you’re hashing yourself, check the Custom JavaScript variable. If Google is supposed to hash, check the setup in the tag.
4. Tag Assistant or EC Assist
The Chrome extension Tag Assistant Companion shows every fired conversion with the user-provided data fields. As an alternative there’s EC Assist, a plugin built specifically for Enhanced Conversions setups that walks you through the error analysis step by step.
5. Google Ads diagnostics
In the conversion detail view there are specific error notes with action instructions. If steps 1 through 4 turn up nothing, that’s the last place to look.
Common hurdles
- Customer data missing on the confirmation page: When the dataLayer (or the other source) doesn’t contain the email, the setup fails. In my view the most common cause in practice.
- Whitespace and capitalization: If you’re hashing yourself, the values have to be normalized first (lowercase, whitespace removed). Otherwise the hashes won’t match Google’s comparison hashes.
- Conflict with Consent Mode v2: When the user hasn’t allowed marketing cookies, the data isn’t allowed to be sent either. In Consent Mode v2 this is controlled automatically when the tags are configured correctly.
- Double tagging: When the direct Google tag setup is active in parallel to the GTM setup, both paths send data and can conflict.
FAQ: common questions about Enhanced Conversions
Do I really need Enhanced Conversions?
If you use Smart Bidding: yes. Browser blockers and cookieless browsers create gaps in your conversion tracking that Enhanced Conversions partly close. The setup effort is manageable.
Are Enhanced Conversions GDPR compliant?
When you’ve implemented Consent Mode v2 cleanly and only send data from users who allowed marketing cookies: yes. The hashes are one-way encrypted, so the plain-text data can’t be reconstructed. The processing has to be listed in your privacy policy.
What do I do if the match rate stays low?
Work through the debugging steps in order: check the dataLayer, GTM preview, network tab with the tv.1~em check, Tag Assistant, diagnostics. The most common causes are missing data fields or wrong normalization of the values.
Conclusion
Conversion tracking gaps are real and they get bigger with every new browser update. Enhanced Conversions close part of those gaps without forcing you to rebuild a whole tracking concept. In my view one of the most accessible measures when you want to work on the data quality for Smart Bidding.
What you need now: customer data on the confirmation page, a clean GTM setup following the seven steps above, and a look at the diagnostics report after a few days. If your regular conversion tracking is still wobbly, start there.
Thanks for reading this far. Good luck putting it into practice!
Work smart with Clicks in Mind
You might also like
 Tracking
 Conversion Adjustments in Google Ads: How to Fix Conversions You've Already Tracked
Conversion adjustments in Google Ads: correct returns, cancellations, and wrong values after the conversion so Smart Bidding bids on real revenue. With a step-by-step guide.
Read more → Tracking
 New-Customer Tracking and Bidding in Google Ads
How to split new from returning customers in Google Ads: the new_customer signal in the conversion tag, Customer Match, and the new-customer features to steer budget toward real growth.
Read more → Tracking
 Advanced Conversion Tracking in Google Ads
Server-side, Enhanced Conversions, cart data, POAS, and conversion adjustments: the advanced conversion-tracking measures in Google Ads, what they bring and how to set them up.
Read more →You want more results with Google Ads?
Get a free Google Ads Reality Check: a compact video (about 10 minutes) showing where budget is slipping away in your account and what to change.
Get your Google Ads Reality Check